Understanding Pencil Grades and Their Impact on Drawing
The H vs. B Scale: Hardness and Darkness Explained
Knowing about different pencil grades really makes a difference when creating good artwork. The H and B system tells us how hard or dark our pencil marks will be. On the H side we get harder pencils - think H for hard, HB which is kind of medium hard, and F that gives us a nice fine point but still light marks. Then there's the B scale where things get darker. Pencils marked B1 and above give much softer lines with lots of blackness, great for those areas where we want deep shadows and strong contrast. Most artists pick their pencils based on what they need for shading, tone, and line quality in their drawings. Someone working on detailed portraits might reach for an HB while someone doing landscapes could prefer a 4B for those rich darks. Getting familiar with this numbering system just means having the right tool in hand whenever we need it for whatever effect we're going after.
Choosing the Right Grade for Different Techniques
Choosing the correct pencil grade makes all the difference when learning different drawing methods. Harder pencils like H or F work great for detailed lines and hatching because they don't smudge much and stay sharp longer. Artists often reach for softer B pencils when creating shadows or building gradients across surfaces. Trying out various pencil grades helps figure out what works best for each person's style. Some drawers stick with harder pencils for fine details while others love the rich blacks from softer leads in their more dramatic pieces. Every pencil grade offers something special, so experimenting with them lets artists find their own voice and get the look they want without wasting time on trial and error.
How Graphite Composition Affects Performance
What kind of graphite is inside those pencils really makes a difference when creating art. Brands mix things up quite a bit too. Some pencils give darker lines than others because of how they blend the graphite. The stuff that holds the graphite together also matters a lot for how the pencil works on different papers and surfaces. Artists who want to get serious about their craft should check out reliable brands and try out all sorts of graphite mixes. Take for instance pencils with good balance between hardness and softness tend to glide better across paper. Others work great for making rough textures or deep shadows. When artists play around with different types, they eventually discover which ones match their style best and let them express themselves more fully through their drawings.
Erasers: Kneaded, Vinyl, and Gum Options
Artists really need good erasers, and there's quite a few different kinds out there for various jobs. Kneaded erasers work great for those fine tweaks because they pick up graphite so gently from the page without tearing anything apart. They're fantastic when working on highlights or getting those tiny details just right. Vinyl erasers tell a different story altogether. These bad boys give super clean lines but watch out if you press too hard or go over the same spot multiple times since they can actually tear through the paper. For bigger chunks that need erasing, most folks reach for gum erasers instead. They're not as harsh on the paper surface while still getting rid of decent amounts of graphite at once. Some artists even mold these into weird shapes to make erasing certain parts easier during complex drawings.
Sharpeners: Manual vs. Electric for Precision
Picking out the correct sharpener makes all the difference when keeping drawing pencils in good shape. Hand operated models give much better control during sharpening, which cuts down on broken tips something many artists really appreciate for their precise work. These manual options let creators get those super fine points needed for intricate details or cross hatching techniques that just don't come through with other methods. Electric versions work great when someone has dozens of pencils to sharpen at once, definitely saves time but watch out they often leave behind inconsistent points unless handled properly. Spending a bit extra on quality sharpening equipment pays off big time in the long run. Better sharpeners mean better performing pencils, so artists never have to worry about their tools letting them down during important projects.
Blending Tools: Stumps, Tortillons, and Brushes
Blending tools really matter when it comes to getting those smooth transitions and nice shading effects in drawings. Blending stumps are basically just tightly rolled paper that lets artists gently smear graphite around, which helps spread it out more evenly across the surface. Artists find these especially helpful for making those soft gradient effects and adding subtle textures to their work. Then there are tortillons too, which work kind of like stumps but are much smaller in size. These little guys shine when working on tiny details or cramped spaces where bigger tools wouldn't fit, giving precise control over shading without messing things up too much. For covering bigger sections, brushes come into play. They help soften harsh lines and flatten out tones, letting artists experiment with different textures they might not otherwise get. All these blending options give drawers so many ways to tweak and improve their technique, which is why most serious artists keep several types handy in their drawing kits.
Paper Types: Textured vs. Smooth for Desired Effects
The choice of paper makes all the difference when creating drawings. Artists who want deep shadows and rich textures often turn to rough surfaced papers because they grab onto graphite better, producing those dark, dramatic effects we love. But be warned these papers can tear easily unless working with softer pencil grades. Smooth surfaces offer something different though. They give that crisp clean look great for intricate details, although any smudges show up immediately if hands aren't steady enough during sketching. Knowing what kind of visual impact desired really matters when picking out materials. A good match between paper type and artistic approach ensures that finished pieces look exactly how they were meant to appear from the start.
Drawing Pads: Affordable Options for Practice
Cheap drawing pads are actually pretty awesome if someone wants to get better at sketching without spending a fortune. The key is finding ones with decent paper quality that won't eat into your wallet too much, so regular practice becomes possible. Most affordable options these days offer various weights from lightweight stuff for quick sketches to heavier stock for detailed work, which works well whether someone is just starting out or already pretty skilled. When picking one out, don't forget to check how sturdy the binding is since some fall apart after only a few sessions. A good pad lasts longer and feels worth the money spent, which means artists end up using it more often. Plus, experimenting with different papers teaches people what works best for their particular style of drawing.
Canvas and Specialty Surfaces for Mixed Media
Canvas works great when working with mixed media because it handles both graphite and paint so well. Artists love how it gives them space to try out different techniques and finish their pieces in ways they wouldn't get on other materials. Some specialty canvases made for particular methods open up totally new avenues for creativity too. Take stretched versus mounted canvases for instance. Each has its own personality that affects how layers build up over time. Getting familiar with what each surface does means artists can really push boundaries in their work. Many painters find that knowing which canvas matches their style helps them create stronger compositions and achieve those effects they've been after for years.
Layering and Burnishing for Depth
When trying to create depth in pencil drawings, artists should look at layering and burnishing as key methods worth exploring. Layering basically means adding color and shade bit by bit until the paper shows what the artist wants. This approach creates those subtle differences in tone that make drawings feel three dimensional rather than flat on the page. Some people find this process really helps their work come alive. Burnishing works differently though it gives drawings that smooth, shiny look. Works best when working with softer pencils after multiple layers have been applied. Artists who spend time mastering both approaches often notice dramatic improvements in their finished pieces. What starts as simple lines becomes something much more interesting and visually engaging over time.
Combining Graphite with Charcoal or Ink
When artists mix graphite with materials such as charcoal or ink, they often find their drawings take on greater depth and visual interest. Charcoal works wonders for adding those bold black areas and rich shadow tones that pencil alone struggles to achieve. Ink brings something different to the table too it creates crisp edges and sharp outlines that stand out against the gentler graphite textures. Getting comfortable with blending these various materials expands what an artist can do creatively, opening up possibilities for distinctive styles and approaches. Many creators who experiment with these combinations report finding unexpected ways to express mood and atmosphere in their work, sometimes leading to entirely new directions in their artistic practice.
Using Fixatives to Preserve Finished Art
Keeping pencil art intact presents some real challenges, though fixatives provide an effective way to protect against smudges and color loss. When applied properly, these products help drawings last longer by locking graphite particles to the surface of the paper. Artists should know there are two main types available on the market today. Workable formulas let creators make adjustments after application while permanent versions essentially freeze everything in place once dry. Getting this right makes all the difference when it comes to how finished works look down the road. A good quality fixative applied in thin even coats will preserve details without changing the original texture or shading. Many professionals recommend testing small areas first before committing to full coverage across large compositions.
Proper Storage to Prevent Breakage
Good storage makes all the difference when it comes to keeping pencils intact and avoiding broken tips. Art supply containers work wonders at cutting down damage risks while making sure everything stays within reach. When artists store their materials properly, they actually get more mileage out of their pencils too. No more wasting time digging through messy drawers during creative sessions. Keep those drawing tools somewhere shaded as well since exposure to sun light tends to wear them down faster than we'd like. The quality lasts longer this way without unexpected surprises halfway through important projects.
Cleaning Tips for Erasers and Blenders
Taking care of those erasers and blenders makes all the difference for keeping them working well and getting more life out of them. Kneaded erasers need regular cleaning to hold their shape and stay effective over time. When they're clean, artists find it much easier to lift off just the right amount of graphite without smudging or tearing paper accidentally. The same goes for blenders too. Artists who switch between different colored pencils should definitely clean their blenders in between to avoid mixing colors unintentionally. A quick wipe with a dry cloth after each session works wonders for most materials. These simple habits really pay off when trying to get smooth gradients and perfect blends in artwork.
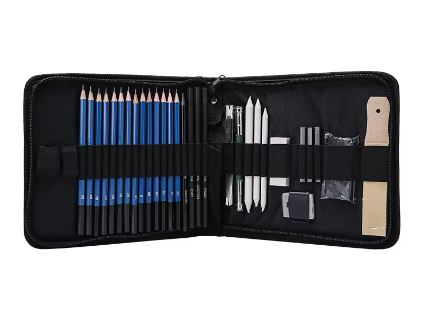
Portable Kits for Artists on the Go
For artists on the move, carrying around a good portable kit really matters when sudden creative ideas pop up wherever they may be. Small pencil cases let folks take all their basic drawing stuff wherever they go, which helps spark artistic moments even in unexpected places. A decent kit usually comes with different pencil hardness levels plus little extras like erasers and sharpeners, so artists can switch between sketching styles without missing a beat. Spending money on something durable that won't fall apart during transit definitely pays off in the long run. Most artists find themselves reaching for their trusty case while waiting at airports or sitting by lakesides, since nothing beats having everything ready to go right there in hand.
Table of Contents
-
Understanding Pencil Grades and Their Impact on Drawing
- The H vs. B Scale: Hardness and Darkness Explained
- Choosing the Right Grade for Different Techniques
- How Graphite Composition Affects Performance
- Erasers: Kneaded, Vinyl, and Gum Options
- Sharpeners: Manual vs. Electric for Precision
- Blending Tools: Stumps, Tortillons, and Brushes
- Paper Types: Textured vs. Smooth for Desired Effects
- Drawing Pads: Affordable Options for Practice
- Canvas and Specialty Surfaces for Mixed Media
- Layering and Burnishing for Depth
- Combining Graphite with Charcoal or Ink
- Using Fixatives to Preserve Finished Art
- Proper Storage to Prevent Breakage
- Cleaning Tips for Erasers and Blenders
- Portable Kits for Artists on the Go